 To display the tree of trips and work with it, use the main task tab to
select "create/edit trips and ticks". A dialog will appear and display
trips hierarchically. Before you create your first trip, only a single
entry will be present.
To display the tree of trips and work with it, use the main task tab to
select "create/edit trips and ticks". A dialog will appear and display
trips hierarchically. Before you create your first trip, only a single
entry will be present.
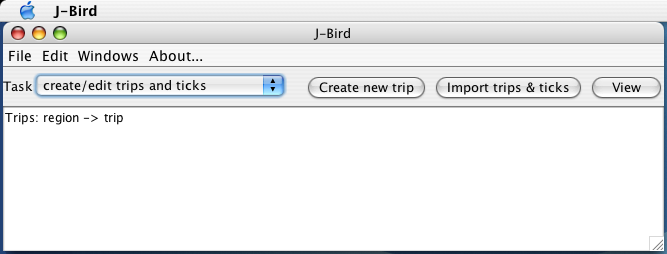
J-Bird is organized around the idea of observing birds on trips. Trips are displayed in a hierarchical tree. You can use the tree to create new trips, to select trips and edit information about them or edit the species that have been seen on them, and also to delete trips (and all ticks that are associated with them). You'll select a trip from the tree and right-click (ctrl-click on Mac OS X) on it select from the pop-up menu that appears. In response to your selection, dialogs will appear that can be used to enter/edit information about trips or for selecting species and creating notes for species that have been observed. Dismiss the dialogs when you are finished with them.
To display the tree of trips and work with it, use the main task tab to
select "create/edit trips and ticks". A dialog will appear and display
trips hierarchically. Before you create your first trip, only a single
entry will be present.
 After creating
a number of trips, the tree might appear like the tree to the right.
Branches of the tree (regions in this case) can be opened and closed by
clicking on them. The scroll bar can be used to scroll up and down over
the tree.
After creating
a number of trips, the tree might appear like the tree to the right.
Branches of the tree (regions in this case) can be opened and closed by
clicking on them. The scroll bar can be used to scroll up and down over
the tree.
The tree hierarchy can be changed. For example, instead of displaying trips within regions, it is possible to display trips within years or to display trips within years within regions. Also available are trips within months within years and trips within months within regions within years. Use the view button to select the view that you prefer. Shorter views (i.e., trips within regions or trips within years) are usually best until you accumulate some trips.
Trips can be selected singly or multiply, and the process of selecting trees depends on the type of computer that you have.
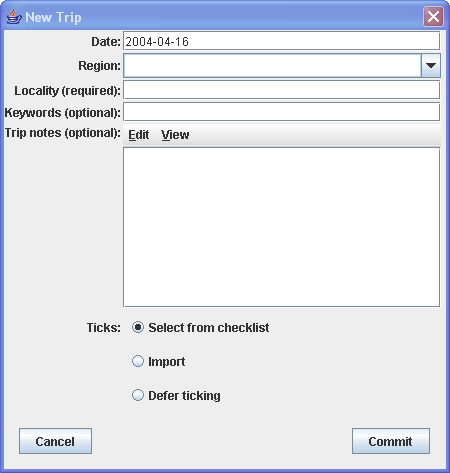 To create a trip, click on the menu item "Create new trip", or right-click
(Linux and Windows) or ctrl-click (Mac OS X) on the tree to obtain a pop-up menu
and select "Create new trip". A dialog like that shown will appear.
To create a trip, click on the menu item "Create new trip", or right-click
(Linux and Windows) or ctrl-click (Mac OS X) on the tree to obtain a pop-up menu
and select "Create new trip". A dialog like that shown will appear.
There are two ways to obtain a checklist from which you can tick species that you have observed on trips: create a trip without ticking the check box "Defer ticking of species"; and select one or more trips from the trip tree and click to display a pop-up menu as described in the previous section and then select "View/edit species list". You will be presented with a choice of checklists to use if checklists exist, and then you will be presented with the selected checklist from which you can tick species.
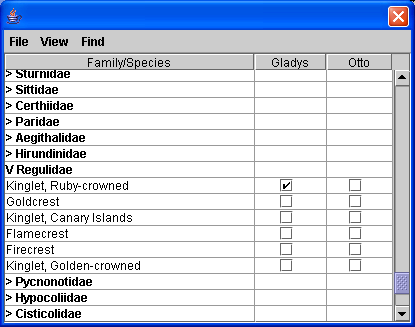 The checklist contains family names and species names.
All species will
be displayed if the checklist contains fewer than 600 species. Otherwise,
only family names will be displayed. Species within families can be
displayed by clicking on the ">" that precedes family names, and they
can be hidden by clicking on the "V"'s that precede names of families that
are expanded.
The checklist contains family names and species names.
All species will
be displayed if the checklist contains fewer than 600 species. Otherwise,
only family names will be displayed. Species within families can be
displayed by clicking on the ">" that precedes family names, and they
can be hidden by clicking on the "V"'s that precede names of families that
are expanded.
A column is present in the checklist table for each observer in the database for each trip that was selected. Columns can be dropped from the table by using a pop-up menu that is associated with column headers. Right-click in the appropriate column header, or ctrl-click on Mac OS X, and select "drop column" from the menu that pops up.
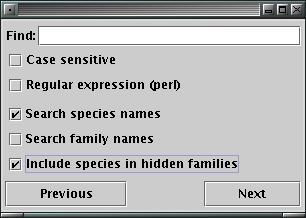 The Find menu allows you to activate the species finder. You can search
species names, family names or both by selecting the appropriate check boxes.
If hidden families are searched, they will be opened if species are found in
them. Otherwise, only species in expanded families will be searched.
To search, type a name or partial name in the text box and press return or
click the "Next" button.
The Find menu allows you to activate the species finder. You can search
species names, family names or both by selecting the appropriate check boxes.
If hidden families are searched, they will be opened if species are found in
them. Otherwise, only species in expanded families will be searched.
To search, type a name or partial name in the text box and press return or
click the "Next" button.
Regular expressions allow you specify patterns rather than literal strings. For example, to search for color or colour the pattern would be colou?r. The question mark indicates zero or one occurrence of the letter before it. If you you are unsure whether Night-Heron is hyphenated, you could specify night[- ]heron. The square brackets indicate that any one of the enclosed letters is OK. Here it was a hyphen and a space. More information about using patterns is available on the finders page .
 You can tick to indicate which species were seen, or you can enter counts of
the number of individuals that were observed. Ticks will be displayed for
the first trip that you edit. You can switch between ticks and counts by
using the View menu on the window that contains the checklist. It is also
possible to tick from checklists in which some columns contain ticks and others
counts as in the checklist that is shown below. To change the
display of a single column, move the mouse to the column heading and
right-click on Windows and Linux or ctrl-click on Mac OS X. A menu
will appear that allows you to toggle between ticks and counts.
You can tick to indicate which species were seen, or you can enter counts of
the number of individuals that were observed. Ticks will be displayed for
the first trip that you edit. You can switch between ticks and counts by
using the View menu on the window that contains the checklist. It is also
possible to tick from checklists in which some columns contain ticks and others
counts as in the checklist that is shown below. To change the
display of a single column, move the mouse to the column heading and
right-click on Windows and Linux or ctrl-click on Mac OS X. A menu
will appear that allows you to toggle between ticks and counts.
If ticking species, click on the check boxes to tick or untick species. If entering counts, click in a cell to edit the value. A cursor will appear. Enter an appropriate number: positive numbers reflect numbers of individuals seen, 0 indicates that the species was not seen. You can use an X to indicate that a species was observed but not enumerated. You can press return when finished with a count or move the mouse out of the cell that you have been editing.
Notes can be associated with individual species. They are represented on tick checklists as "n"'s and on count checklists as canary-colored sheets of paper as shown in the checklist above. To enter or edit notes for an observation, pop-up a menu for the appropriate cell by right-clicking on Windows and Linux and ctrl-clicking on Mac OS X. Select the item "Edit notes". A dialog will appear in which you can click to activate and then type notes. As with trip notes, press return where you want paragraph breaks to be. Notes are stored as web documents (HTML), and it is possible to see and edit the HTML using the View menu of the dialog. Again, Java is picky about HTML and does not tolerate deviations from the standard that are gracefully handled by most web browsers. Dismiss the notes window when finished with a note.
Notes can be deleted in two ways: select the "delete note" entry in the pop-up menu that is associated with a cell, or select "edit note" and use the Edit menu -> Clear item to clear all text before dismissing the notes window.
J-Bird can pop-up images and play sounds to celebrate life ticks, region ticks and trip ticks. These features can be turned on and off by editing your preferences (Edit -> Preferences).
J-Bird is installed with sound turned off to prevent problems on computers that do not have sound cards. The sounds are
As indicated in the License section, these recordings are (P) Borror Laboratory of Bioacoustics, Department of Evolution, Ecology, and Organismal Biology, Ohio State University, Columbus, OH, all rights reserved.
You can use alternative sound files. Use the preferences dialog (Edit -> Preferences) to specify alternative files. Click on the name of the file, and a file-chooser dialog will appear. After you've chosen a file, you will be able to edit the credit. The following formats are supported by Java and should be usable:
Note that Java cannot deal with some methods of compression, and that it is difficult to determine from documentation which methods are supported and which are not. Your best bet is to try, and to fall back to older methods of compression until you find one that works. (Note that components of the preferences editor that allow you to set a sound file to be played in response to errors have been disabled because, J-Bird is not yet capable of playing sounds in responses to errors.)
Trip reports list information about a trip including: date, region, locality, keywords, trip notes, observers, species observed and species notes. Reports can be configured to contain some or all of the information just listed. They can be displayed in the default web browser or written to files as web (HTML) documents. J-Bird provides no means of printing trip reports. To print a trip report, display it in a web browser and used the browser's print feature.
 To prepare a trip report, select a trip in the tree of trips and pop-up
a menu by right-clicking on the trip on Linux or Windows and by ctrl-clicking
on Mac OS X. A dialog will appear that can be used to configure the
trip report.
To prepare a trip report, select a trip in the tree of trips and pop-up
a menu by right-clicking on the trip on Linux or Windows and by ctrl-clicking
on Mac OS X. A dialog will appear that can be used to configure the
trip report.
Trip reports can be converted from web pages (HTML files) into Microsoft Word documents using recent versions of Microsoft Word.
| Previous (First steps with J-Bird) | Contents | Next (Import trips & ticks) |
Last update 20 March 2007