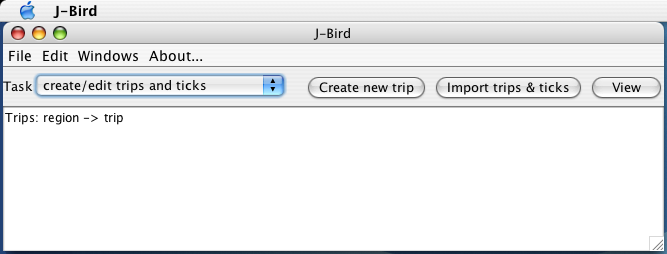
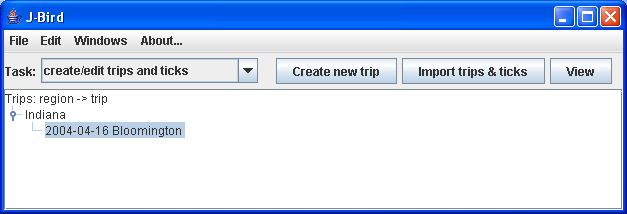
 When you start J-Bird for the first time, J-Bird will be ready to create
a trip. A window will appear that contains a single line that reads "Trips:
region -> trip".
When you start J-Bird for the first time, J-Bird will be ready to create
a trip. A window will appear that contains a single line that reads "Trips:
region -> trip".
When you start J-Bird for the first time, J-Bird will be ready to create
a trip. A window will appear that contains a single line that reads "Trips:
region -> trip".
You can create a trip by clicking on the button "Create new trip". A form will appear that you can fill in and dismiss.
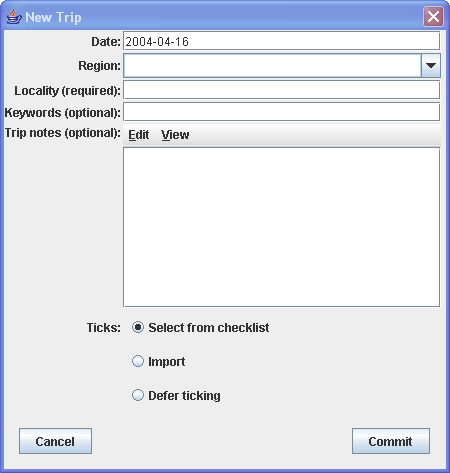 On the form date, region and locality are
required. If you choose to enter notes about the trip, click in the
text box to focus on it, type at will and press
return to begin new paragraphs. Below the text box for notes are three check
boxes that allow you to choose from among the choices: tick species now,
import ticks from some other data source, and defer ticking to some later
time. This page describes how to tick species now. When you dismiss the form
window, a new small window will appear if you did not create observers when
you created the master list of species.
On the form date, region and locality are
required. If you choose to enter notes about the trip, click in the
text box to focus on it, type at will and press
return to begin new paragraphs. Below the text box for notes are three check
boxes that allow you to choose from among the choices: tick species now,
import ticks from some other data source, and defer ticking to some later
time. This page describes how to tick species now. When you dismiss the form
window, a new small window will appear if you did not create observers when
you created the master list of species.
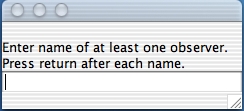
If the form appears, click in the box and enter the names of observers for whom data will be recorded. Type in the names, pressing return after each name. After entering the last name, dismiss the window. A new window will appear that you can use to tick species that were observed on the newly created trip, if you elected to tick species.
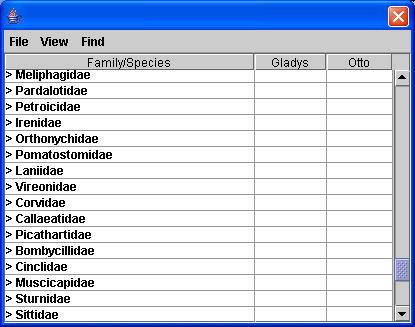 You'll be ticking species from the master list of
species because no other checklist is available. Only family names will
be displayed, each preceded by a ">" that indicates that the
families are closed. To open a family for ticking,
click on the ">" sign.
You'll be ticking species from the master list of
species because no other checklist is available. Only family names will
be displayed, each preceded by a ">" that indicates that the
families are closed. To open a family for ticking,
click on the ">" sign.
Unless you know families very well, it can be difficult to locate species that you need to tick. A finder is available for locating species. To use it click the Find menu and select "Find species ...".
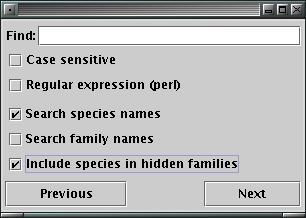 The simplest way to use the species finder is to tick the box "Search
species names", tick the box "Include species in hidden families",
type into the text box a portion of the name of the species that you would
like to locate and click "Next". Families will be expanded to show species
that are found.
The simplest way to use the species finder is to tick the box "Search
species names", tick the box "Include species in hidden families",
type into the text box a portion of the name of the species that you would
like to locate and click "Next". Families will be expanded to show species
that are found.
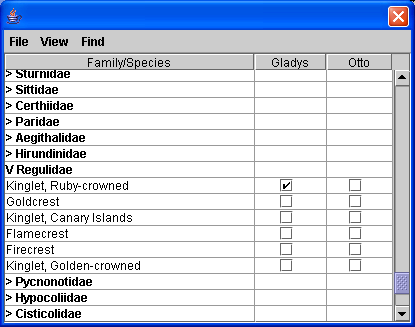 The names of species will appear along with
checkboxes. Tick at will. Right-click (crtl-click on OS X) on a ticked box
to bring up a menu that provides various operations including entering notes
regarding a tick. If you prefer to enter counts instead of ticks, use the
View button to switch the display to counts. To enter a count, click on a
species for an observer and enter the count. When you have finished ticking
species on the trip, dismiss the window, and you will see that the trip is now
visible in the original window.
The names of species will appear along with
checkboxes. Tick at will. Right-click (crtl-click on OS X) on a ticked box
to bring up a menu that provides various operations including entering notes
regarding a tick. If you prefer to enter counts instead of ticks, use the
View button to switch the display to counts. To enter a count, click on a
species for an observer and enter the count. When you have finished ticking
species on the trip, dismiss the window, and you will see that the trip is now
visible in the original window.
 If you
right-click on the trip (ctrl-click on OS X) a pop-up menu will appear that allows you to edit trip info or ticks, delete the trip or prepare a trip report.
If you
right-click on the trip (ctrl-click on OS X) a pop-up menu will appear that allows you to edit trip info or ticks, delete the trip or prepare a trip report.
 Right-click (ctrl-click on Mac) on the trip that you just created, and select trip report in the
menu that pops up. A dialog will appear that lets you configure the
trip report.
Right-click (ctrl-click on Mac) on the trip that you just created, and select trip report in the
menu that pops up. A dialog will appear that lets you configure the
trip report.
Trip reports in J-Bird are created as web pages. Reports can be displayed in your default web browser or saved to a file. There is no mechanism for printing trip reports in J-Bird. To print a trip report, have it displayed in your web browser and use the browser to print the report. You can include or exclude trip notes and species notes. You can chose between displaying common names or scientific names or displaying ticks or counts. You can include observers in the report or just list species that were seen by anybody.
Ticking from the master species list gets old quickly. Chances are that you'll decide that it would be nice to tick species from checklists. You can build checklists by importing them or by selecting species manually from a list. This section describes how to create checklists by selecting species from the master species list. If you travel, think broadly when choosing which checklist to make first because you will be able to use that checklist as a template to make checklists of more restricted areas. A good choice is to make a checklist that corresponds to your guide area. For example, the first checklist might be of birds on your continent that is then used as a template to build checklists for provinces or political states.
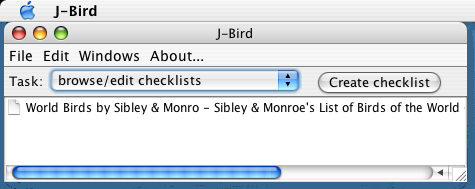 Up to this point the focus of J-Bird has been to create and manipulate
trips. To create and edit checklists, click the task chooser and
select "browse/edit checklists". The lower portion of the window will change
to contain only one line that provides the name of the master
list of species.
Up to this point the focus of J-Bird has been to create and manipulate
trips. To create and edit checklists, click the task chooser and
select "browse/edit checklists". The lower portion of the window will change
to contain only one line that provides the name of the master
list of species.
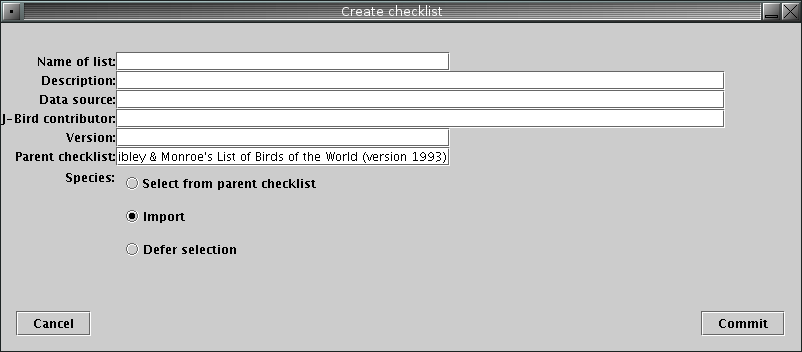
To create a checklist click on the button "Create checklist". A form will appear that you use to enter information about the new checklist.
Fill in the form and click the "Commit" button. The name of the list and description will be displayed in the tree of checklists and various checklist selectors in J-Bird. It is futile to try to change the parent list because no other checklist exists. Deferring selection of species is useful if you wish to create a few checklists and then populate them all at once.
 When you commit the information, a checklist will appear. Families will be
closed as they are when you tick species from the master species list, but
you can open them to select species to be included on the checklist that is
being created.
When you commit the information, a checklist will appear. Families will be
closed as they are when you tick species from the master species list, but
you can open them to select species to be included on the checklist that is
being created.
When you have finished selecting species, dismiss the window.
After you've created a checklist, the behavior of J-Bird will change a bit. Before you begin ticking species that have been observed on trips, you'll be asked which checklist to use for ticking. While ticking species that have been observed on trips, you'll be able to switch the checklist from which you are ticking, something that is useful if you happen to see a species that is not on the checklist that you are using. Also, you'll be able to include a checklist in trip reports to list species that were not seen.
After you have created a few trips and ticked the species that you've seen on them, you can do a few other things.
Use the task tab choice to select from among these functions. You may need to move or dismiss the window that displays the trip tree or the checklist tree to see the task tab. (The trees will be incorporated into the main task window in a future version of J-Bird.)
| Previous (Finish master list) | Contents | Next (Creating/editing trips and ticks) |
Last updated 20 March 2007